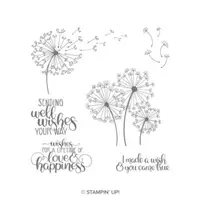
Hello and welcome to my blog; today I am going to share with you a quick and easy card using the Dandelion Wishes Stamp Set from the 2019 2020 Stampin' Up! Annual Catalog. The Dandelion Wishes Stamp Set allows you to send anyone a wish with a dandelion wish. I love quick and easy cards because they are just that quick to produce and easy to create by anyone. These are great card designs for any level crafter and they can recreate them and feel very accomplished. Here's a look at today's card.
Tips & Tricks:
As I mentioned this is actually a really quick and easy card and only took a few minutes to create. I decided to stamp on Pool Party cardstock instead of Whisper White because I wanted to have a tone on tone (monochromatic) look to the card. I stamped one of the large dandelions in the bottom corner because I wanted to have room for the seeds to have room to fly around the card. By stamping the dandelions and the seeds in Pool Party and Pretty Peacock Classic Inks it it creates not only the pattern on the card front but also adds to the monochromatic color scheme.
I matted the card front onto a piece of Pretty Peacock cardstock before adding it to the Crumb Cake card base. My card base was cut at 4 1/4 x 11 scored at 5 1/2. The mat was done at 4 1/8 x 5 3/8. This added just a little broader around the 4 x 5 1/4 card front. I flipped the color scheme for the sentiment and used Crumb Cake Ink to stamp the other dandelion image onto the oval and the Whisper White Crinkle Seam Binding Ribbon. I stamped the sentiment in Early Espresso Classic Ink over the Crumb Cake dandelion image. I added the sentiment piece to a scalloped oval cut from some Pretty Peacock Cardstock. I love the combination of teals and earth colors, they compliment each other so nicely, and just in case you are wondering they are compliments on the color wheel. Which is part of the reasons they work so well together.
Once I had all the pieces stamped and ready it was time to put the card together. I added the stamped ribbon, yes I stamped the ribbon to add a little color and texture to it, with a little snail adhesive and looped it into the adhesive. I covered the adhesive with my sentiment piece which I added to the card with Stampin' Dimensionals. To finish off the card I added a few Basic Rhinestones to the front of the card. I placed one in the center of the dandelion and a couple of the sentiment in a triangle pattern to draw your attention.
Video Tutorial:
If you are viewing this post by email you may have to click here or on the image below to view the video. Not all mail servers like to show the embedded video.
Thanks for dropping by today I hope that you enjoyed this quick & easy card and that you will give it a try. By the way the color inspiration for today's card was one that was given to demonstrators and customers last week to help keep us inspired and stamping during this pandemic. So if you use this color scheme please use the #keepstamping if you share your project on social media we would love to see what you have created with it.
Happy Stampin'
Rick Adkins
Use the April Host Code on any order of $50 (before taxes & shipping) or more during the month and receive a gift from me in May as a Thank You. If your order is $150 or more, please don't use the host code. You will forfeit your Stampin' Rewards if you do; and I want you to get those rewards.
If you place any size order with me during the month of April, you will receive the April Creative Stampers Tutorial Bundle from me as a little thank you. This month's tutorial bundle features eleven tutorials that use the outgoing 2018-2020 In Colors. The Creative Stampers Tutorial Bundle can either be earned for FREE with any size order or Can be purchased for $20 from me.
Order $50 (before shipping and taxes) of products from the Ornate Garden Suite of Products in my Online Store in April using the Host Code: ZPBUDHR7 and I will send you’re the Ornate Garden Mega Tutorial Bundle for FREE as a thank you gift. That’s 90 tutorials featuring products from the Ornate Garden Suite (a $21 value) free for purchasing products from the Ornate Garden Suite from me this month free.
Don’t want to order but still would like to get the Ornate Garden Mega Tutorial Bundle featuring 90 projects with both metric and Imperial measurements for each project! You can purchase it from me for $21.00 US any where in the world in my online store by clicking here.
If you have not joined my Paper Pumpkin Subscribers yet now is a great time to do so. The May Kit will feature the 2020 - 2022 In Colors and Paper Pumpkin Subscribers will be the first group to get their hands on them this year a full two weeks before the 2020 - 2021 Annual Catalog goes live. Paper Pumpkin is a great Crafty Subscription kit that comes right to your mail box each month for a low cost of $22.00. It has everything you need to complete the predesigned projects ready to go. It's a great affordable craft escape each month. Click here to sign up! Deadline for the May Kit is May 10th, 2020. Plus, as one of my subscribers you will receive a PDF tutorial of exclusive alternative projects emailed to you each month.


0 Comments:
Post a Comment
Thanks for taking the time to leave a comment.
Much Love,
Rick